Fingerboard Geometry
The following is an article originally published in Bass World Magazine Vol. 39.3
The fingerboard of the double bass is one of the most critical components to the setup of an instrument. In a sense, the fingerboard is where the player and instrument meet or interface with each other. Proper shaping of the board therefore is critical to the overall player experience of a bass. Over the years, I’ve gained some insights into proper fingerboard that I will detail in this article. My first experiences as a luthier were setting up student basses at the Lisle Violin Shop. For our basic instruments, this involved replaning the fingerboard, recutting the nut, installing a new endpin, and recutting the bridge. Early on, I grappled with some of the basic skills such as tool sharpening and tool control. I was also having a consistent problem with my fingerboards. When played with the bow, my setups would buzz easily on the G string. Early on, I attributed this to my lack of technique. Slowly but surely however, I developed better sharpening skills and my tool technique became more fluid and natural. No longer was it a problem for me to accurately control the amount and smoothness of scoop in a board. Even so, I still had trouble with buzzing on the G string. With hundreds of basses to set up, I did experiments. I would vary the amount of scoop I put into boards, sometimes ten basses at a time. What I discovered was this; after a certain point, additional scoop did not improve the buzzing. I needed to look beyond the scoop for my solution.
My first clue came when I replaced the fingerboard on my personal bass. When all was said and done, I could play confidently in the lower register of the G string without any buzzing issues. The fingerboard had a perfectly normal amount of scoop and the strings were a normal height. The principal difference between my bass and the setups I normally do lay in the cross wise curvature, or radius, of the fingerboard. Typically, fingerboards on student basses have as little meat on them as the manufacturers can get away with. As a result, there is not much room to reshape the board. The best one can do is smooth the length of the board and adjust the amount of scoop. The fingerboard I installed on my own instrument was another matter. The board was significantly thicker and came shaped with a compound, or ever changing, curvature end to end. The radius got progressively smaller as it approached the nut. When finished, the resulting fingerboard allowed buzz free bowing without excess scoop or excess string clearance. I’ve since discovered that fingerboards with compound radius consistently perform better, especially for players wanting lower string heights. Let’s take a look at why this is important.

In figure 1, you can see a model of a bridge and fingerboard. The image is from the perspective of the nut looking towards the board. The fingerboard in this image is shaped in the traditional manner. That is, the radius at the bridge end of the fingerboard, the radius at the nut end of the fingerboard, and the radius of the actual bridge are all the same. This is the way I was taught to shape a fingerboard and is how most boards were on the laminated basses I was setting up. This type of setup has two problems, the first being with the string heights across all four strings. When setup this way, it’s possible to set the G and E string clearance to your desired height, but the middle two strings end up relatively higher. Our fingerboard in figure 1 has the D and A strings almost a full millimeter higher than desired. Thumb position on the D string becomes a challenge with this kind of setup.
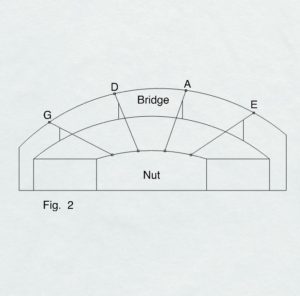
This phenomenon occurs because the strings are not parallel to each other, but rather fan out from the nut. Imagine the shape of a cone. The radius of a cone shrinks as it progresses to the apex. Similarly, the radius your strings make as they progress to the nut should shrink as well. We can fix this problem by making the radius of the fingerboard tighter than the radius of the bridge. In figure 2, we have a new fingerboard shown with a slightly tighter radius, against the original bridge from figure 1. Both the bridge and nut end of the fingerboard still match, as would be traditional. The string clearances now ascend evenly from the G to E, addressing the first problem with the fingerboard in figure 1. Look carefully between figure 1 and 2 and note that the middle two strings are a little lower than in figure 1.
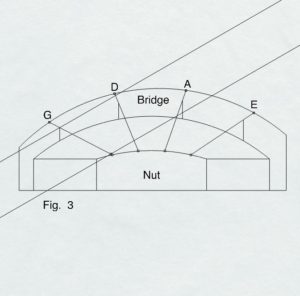
The fingerboard in figure 2 is an improvement, but not without a problem of its own. This problem is more subtle and specific to playing with the bow. Take a look at figure 3. This is same fingerboard as figure 2, but lines have been drawn to represent the angle of the bow as it plays the G string. One line is placed in the normal position, just past the end of the fingerboard. The other is placed near the nut, in plane with the first bow line. I want to draw your attention to how those bow lines correspond to the curvature of the fingerboard directly underneath them. The Bow line closer to the bridge, the one in normal playing position, runs tangent, or parallel, to the area of fingerboard directly underneath the bow. The bow line near the nut however collides with the edge of the fingerboard. The line of tangency at the nut end is significantly flatter than the path of the bow. When bowed, the string vibrates in an elliptical shape that follows the path the bow. Because there is a mismatch between the bowing angle, and the tangency angle, the bow ends up pushing the string right into the fingerboard. When this type of buzzing occurs, the strings are often hitting the area of the fingerboard just outside the G string in the lower register.
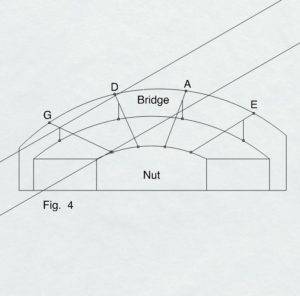
To address this problem, you need to think not so much about radii, but instead about tangency. What we need is a fingerboard where the line of tangency stays virtually the same underneath all four strings. If you think back to idea of the strings making a cone, my first thought is that a perfectly conic fingerboard would be the ideal solution. This requires making the nut radius proportionally tighter in relation to the bridge curve bridge-end fingerboard curve. In Figure 4, I’ve modeled just such a fingerboard.
This board does a much better job of following the bow line than the board in figure 2. My experience shows however that this still isn’t enough. Players are wanting their strings lower and lower to deal with increased standards of repertoire and musicianship . To accommodate this need, I’ve sought to optimize this shape even more. Fortunately, I am far from the first bass luthier to think about these issues. When looking at setups from other reputable shops, I noticed that many shaped their fingerboards to a compound radius. I would occasionally trace a fingerboard I liked during and ISB convention. Taking these “stolen” fingerboard curves, I experimented and developed a set of templates of my own that work quite well. If you look at figure 5, you can see the a new fingerboard modeled with the templates I’ve developed. The nut is even rounder than our conic board from the previous example, yet isn’t so thick that it feels cumbersome in the left hand. You will notice that there is still a slight mismatch between the bow line and the nut curve. To make a board so round to completely avoid this issue would leave it too thick to be comfortable.

As I mentioned before, many shops are already shaping their fingerboards similarly to what I’ve shown above. In certain circles, the idea of a compound radius fingerboard is common knowledge and standard practice. Despite this, I still encounter many basses with poorly shaped fingerboards, sometimes, even on brand new instruments. Ebony supplies are dwindling, so the overall quality of new bass fingerboards is dropping. Therefor, I feel it’s more important than ever for the makers of basses to consider how they are shaping their boards. There is nothing more disheartening than setting up a brand new bass that was delivered with a board too flat and too thin to make truly playable. I hope this article will increase awareness and will serve as a resource for those who want to change their working practices.
A PDF of the template used in figure 5 is available here. I encourage anyone to make use of it in their shops. Make sure to uncheck the “scale to fit” button when printing. Happy planing!
Thank you very much for the article on the fingerboard radius and the template. I will be using this for my bass build
Thanks for the great article on fingerboards man! Hope you’re doing well,
Josh Henley
Greetings Joey, many thks for posting a thought-provoking piece. I’m an orchestral player (arco-German bow) and I like to think I can carry an informed discussion with my luthier. Good old Chuck Treager 🙂 I’ve just acquired my 4th bass ( String Emporium Rogeri copy) on which the fingerboard has been heavily scooped for jazz/gut strings and it flexes at the end. I intend to replace the fingerboard and obtain the best setup I can get. Questions please: I would like to buy a high quality ebony FB and ask your advice on supplier, quality rating, and sizing. My LOS is 105.5 cms (3/4) and I have seen that some luthiers like to start with 4/4 FB to have max options for thickness, length, working around defects etc. I’m in Australia and have been looking at GEWA offerings. In Europe. As you say ebony is becoming scarce, but the FB is such an important working part of the bass I would like to achive the best result, for the effort put in. Your advice most appreciated!
Wow thanks Joey, I have never seen such a complex subject so clearly communicated! I wish I had found it earlier because I went through the steep learning curve about 3 years ago when I designed and built a 3/4 scale EUB. I use the cone geometry and achieved a low action no-buzz result on all strings. Compound curvature was achieved using a custom router jig I designed and the scoop was achieved by trial and error.
Like you I shared what I learned (on TalkBass forum) and another amateur builder is currently using it to build his own – somewhere in India!
I reiterate I am not a luthier it’s just a hobby that I love.
Thanks again
How cool. “Fingerboard Geometry” Its amazing how one can find an answer to anything on the internet these days. Thanks Joey, this is just what I was looking for. Thanks also for the pdf.
Thank you very much for sharing your knowledge on this very important topic Joey !
It’s very clear and helpfull to understand 😉
Thank you for the pdf template too
Gee, thank you my brother. I’ve been searching for many days trying to find clarification on the finer details of bass fb profiling. But I still have one major question: what is your opinion of advanced jazz bass players preferring a completely FLAT end to end profile for G, D, and A, but with a scoop for the E?? I’ve run into this several times now. Chuck Traeger does NOT advise this and as far as I can tell, never mentions it in his books but only describes the traditional scooping across the radius. Any thoughts on any of this???